
Appearance
Build a tabbed settings menu
This is a Blueprint authoring walkthrough, not just a tour of the example. You build the screen and row layout in UMG, define values with Data Assets, and let one IFSettingsMenu coordinate preview, Apply, Cancel and defaults. No game-specific C++ menu builder is required.
Click an image to enlarge it. Use Actual size · 100% and scroll for small editor fields or graph pins. Keyboard users can focus an image, press Enter, tab to the size control and press Escape to return.
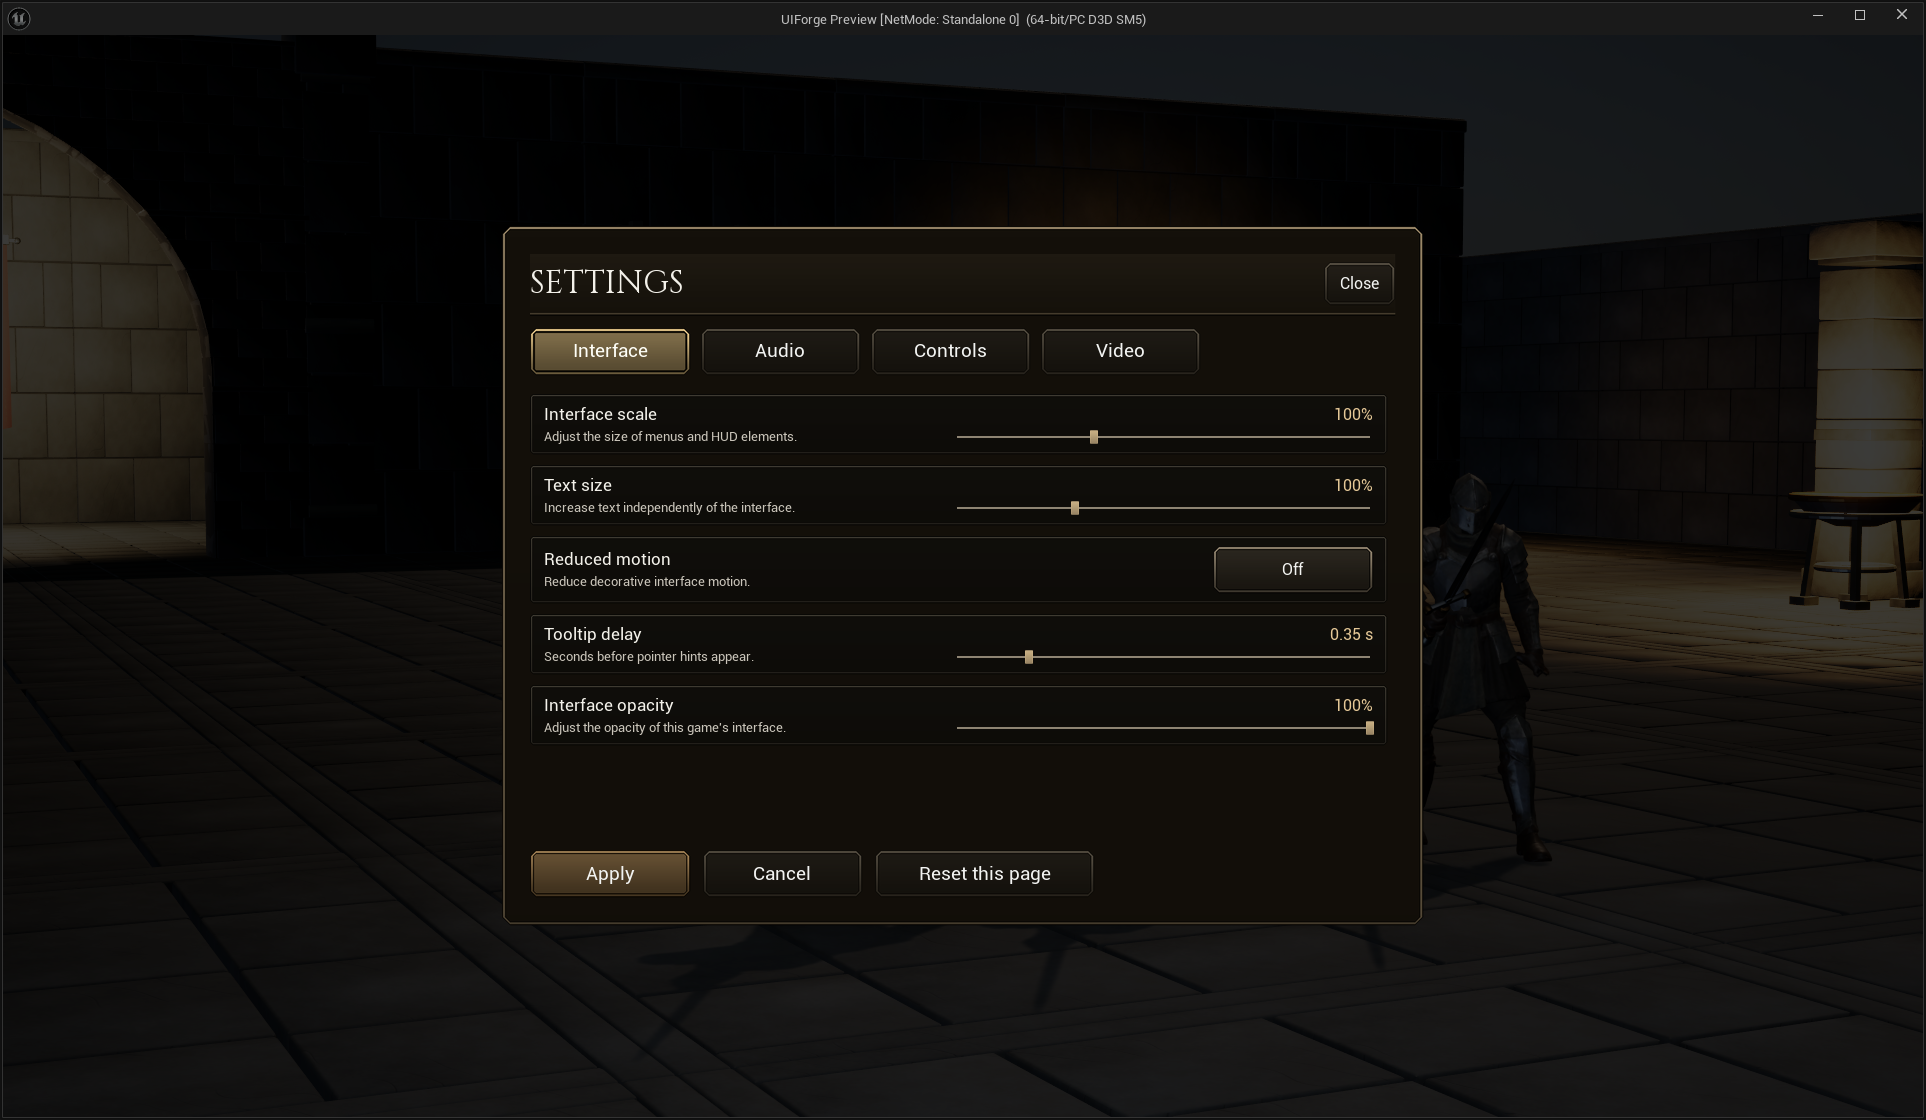
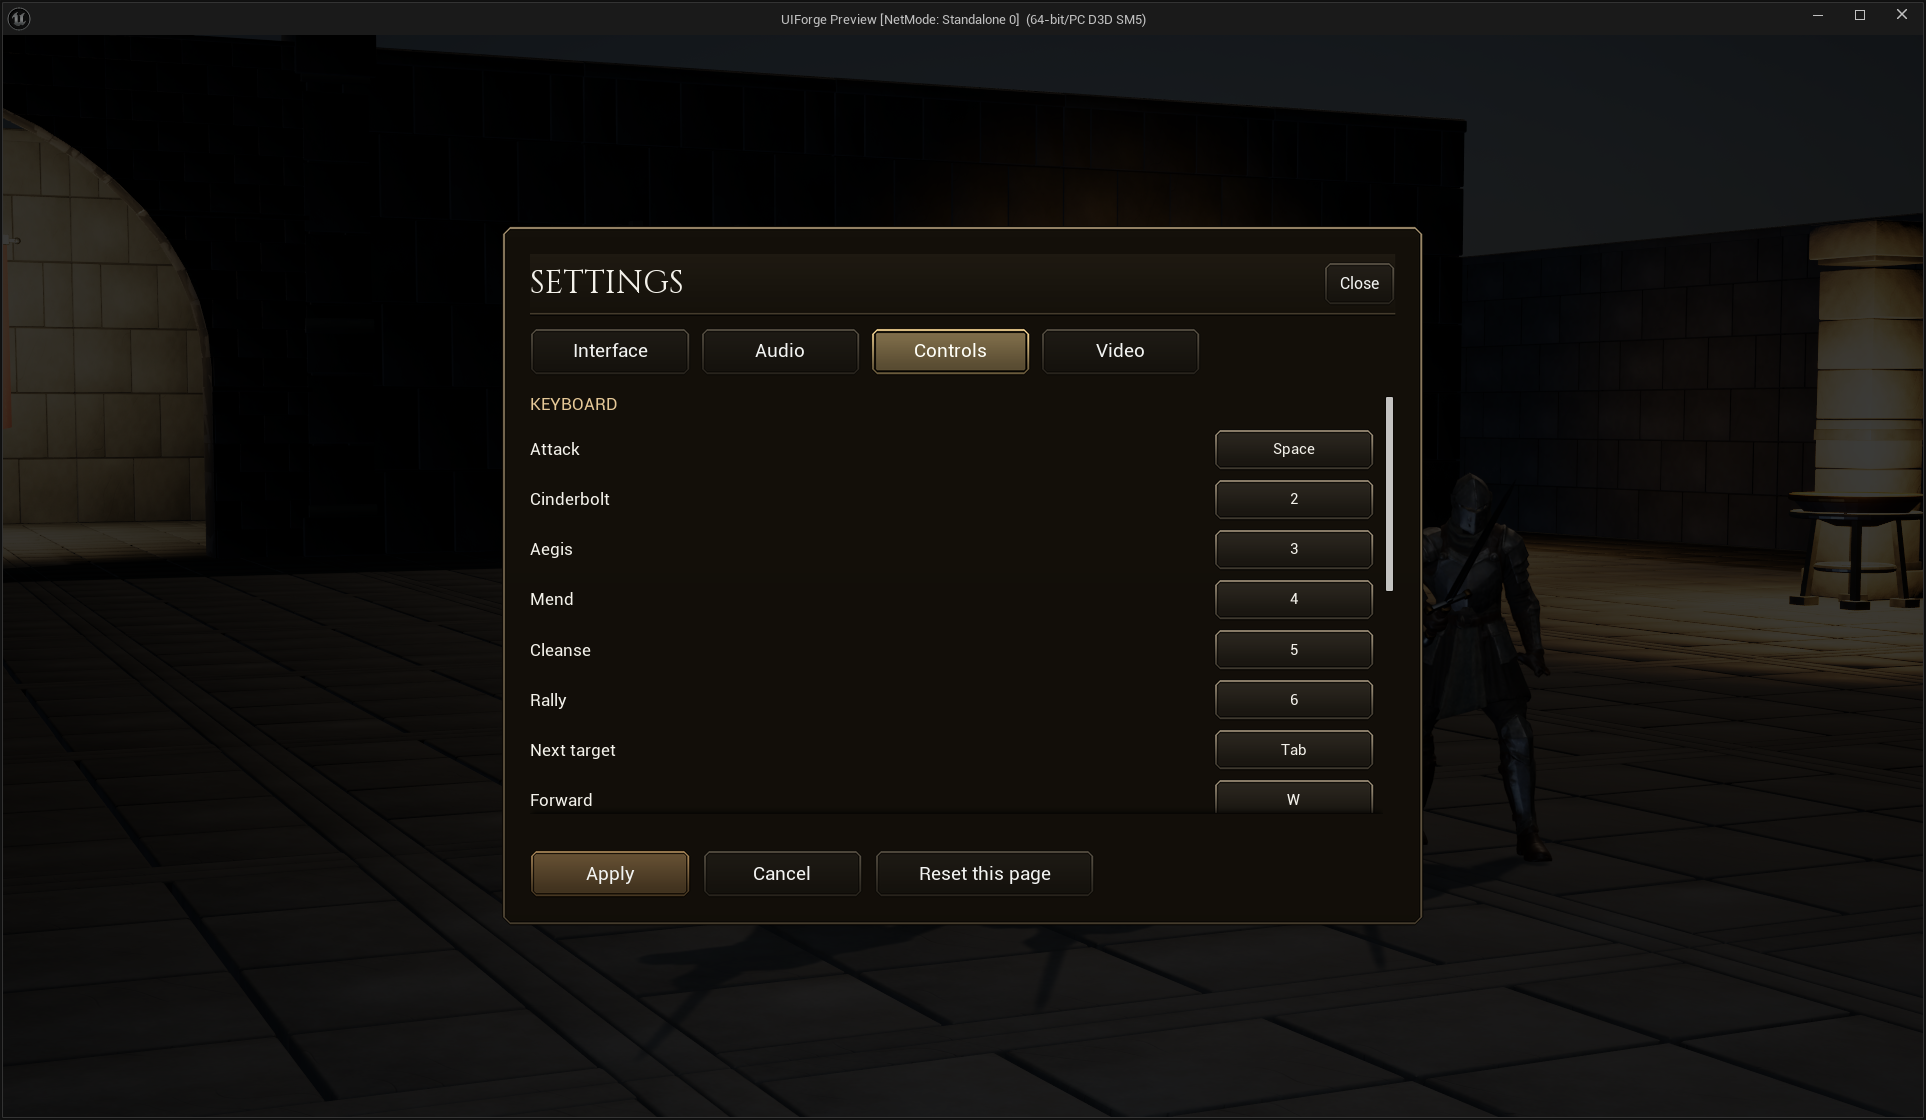
This is the expected playable result. The pictures below show where its pages, tabs, definitions and controls are authored. All captures use the current UE 5.8.3 source project, not the older packaged candidate.
1. Create the screen and its pages
Create a Widget Blueprint with parent IFSettingsMenu. For a saved reference, open /Game/ForgeExamples/UI/RPG/WBP_IFRPGSettings in Designer. Build your background, heading, tabs, page body and footer from ordinary widgets.
Add a Widget Switcher named exactly SettingsPages. Add one page/Scroll Box per category. The example order is Interface, Audio, Controls, Video.
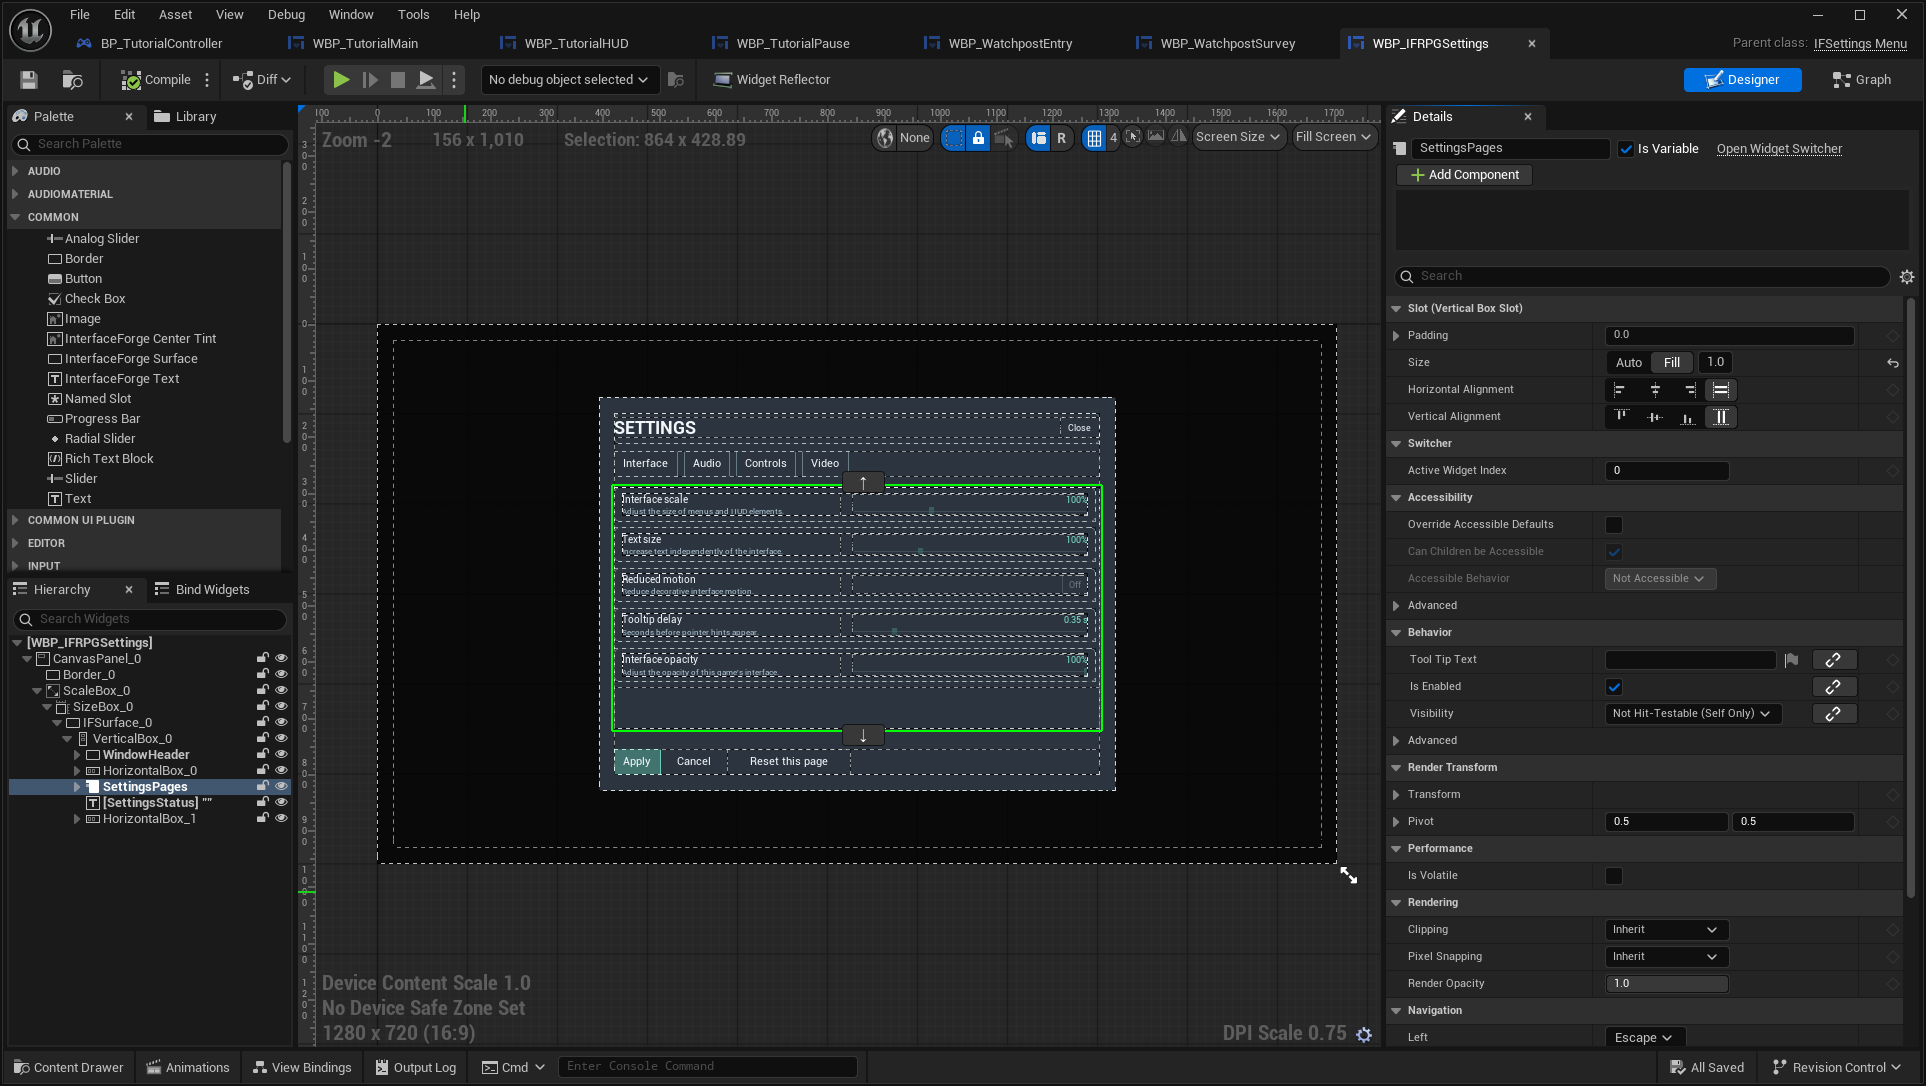
Select SettingsPages in the left Hierarchy. Its children are the category pages. The preview is a design-time view; gameplay preferences are not loaded or changed by opening this asset.
Choose Class Defaults → Page Ids and enter Interface, Audio, Controls, Video in the same order. If you reorder pages, reorder the IDs too.
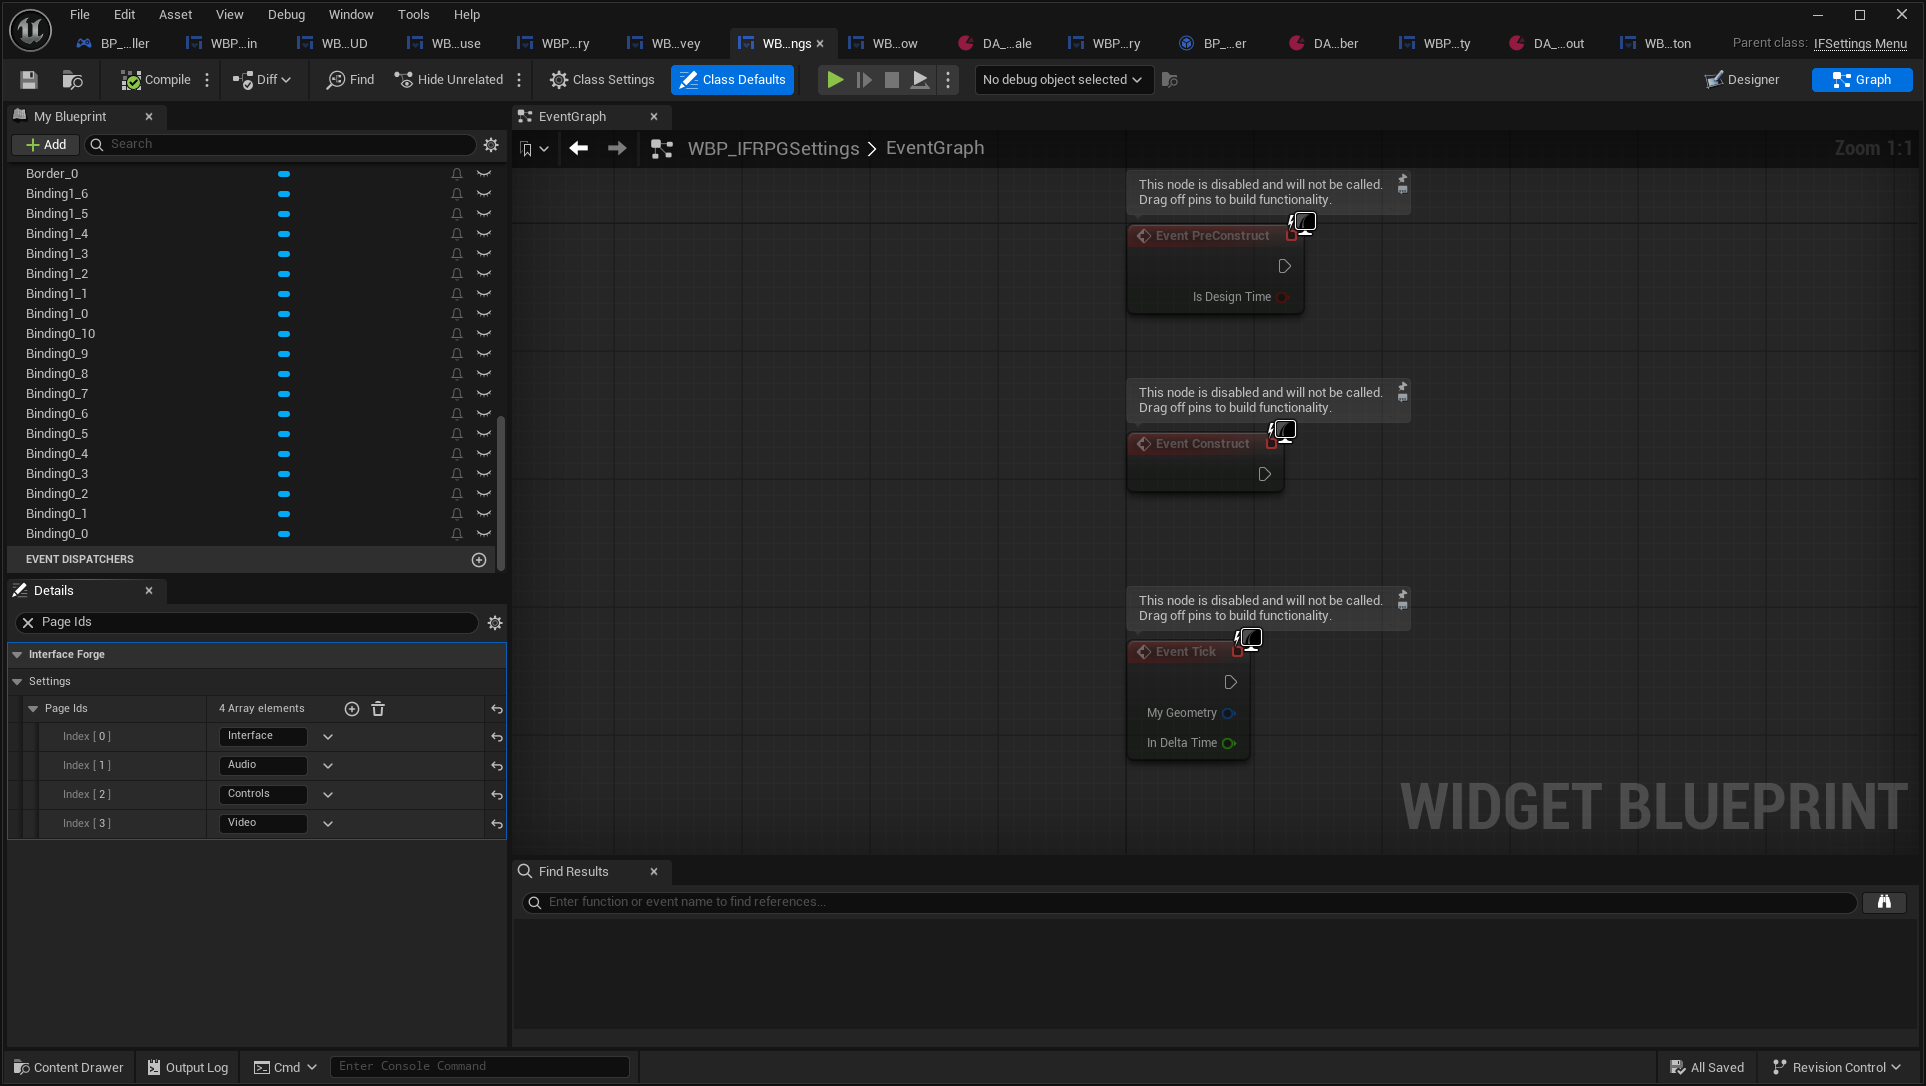
Expected: each page has one stable identity. A setting's Page Id connects it to defaults/category behavior; it is not a localized tab label.
2. Add navigation tabs
Place an IFSettingsTabButton for each page. Set its Label and Page Index. The example uses Tab0 through Tab3, with indices 0–3. Their layout and skins remain normal Blueprint controls.
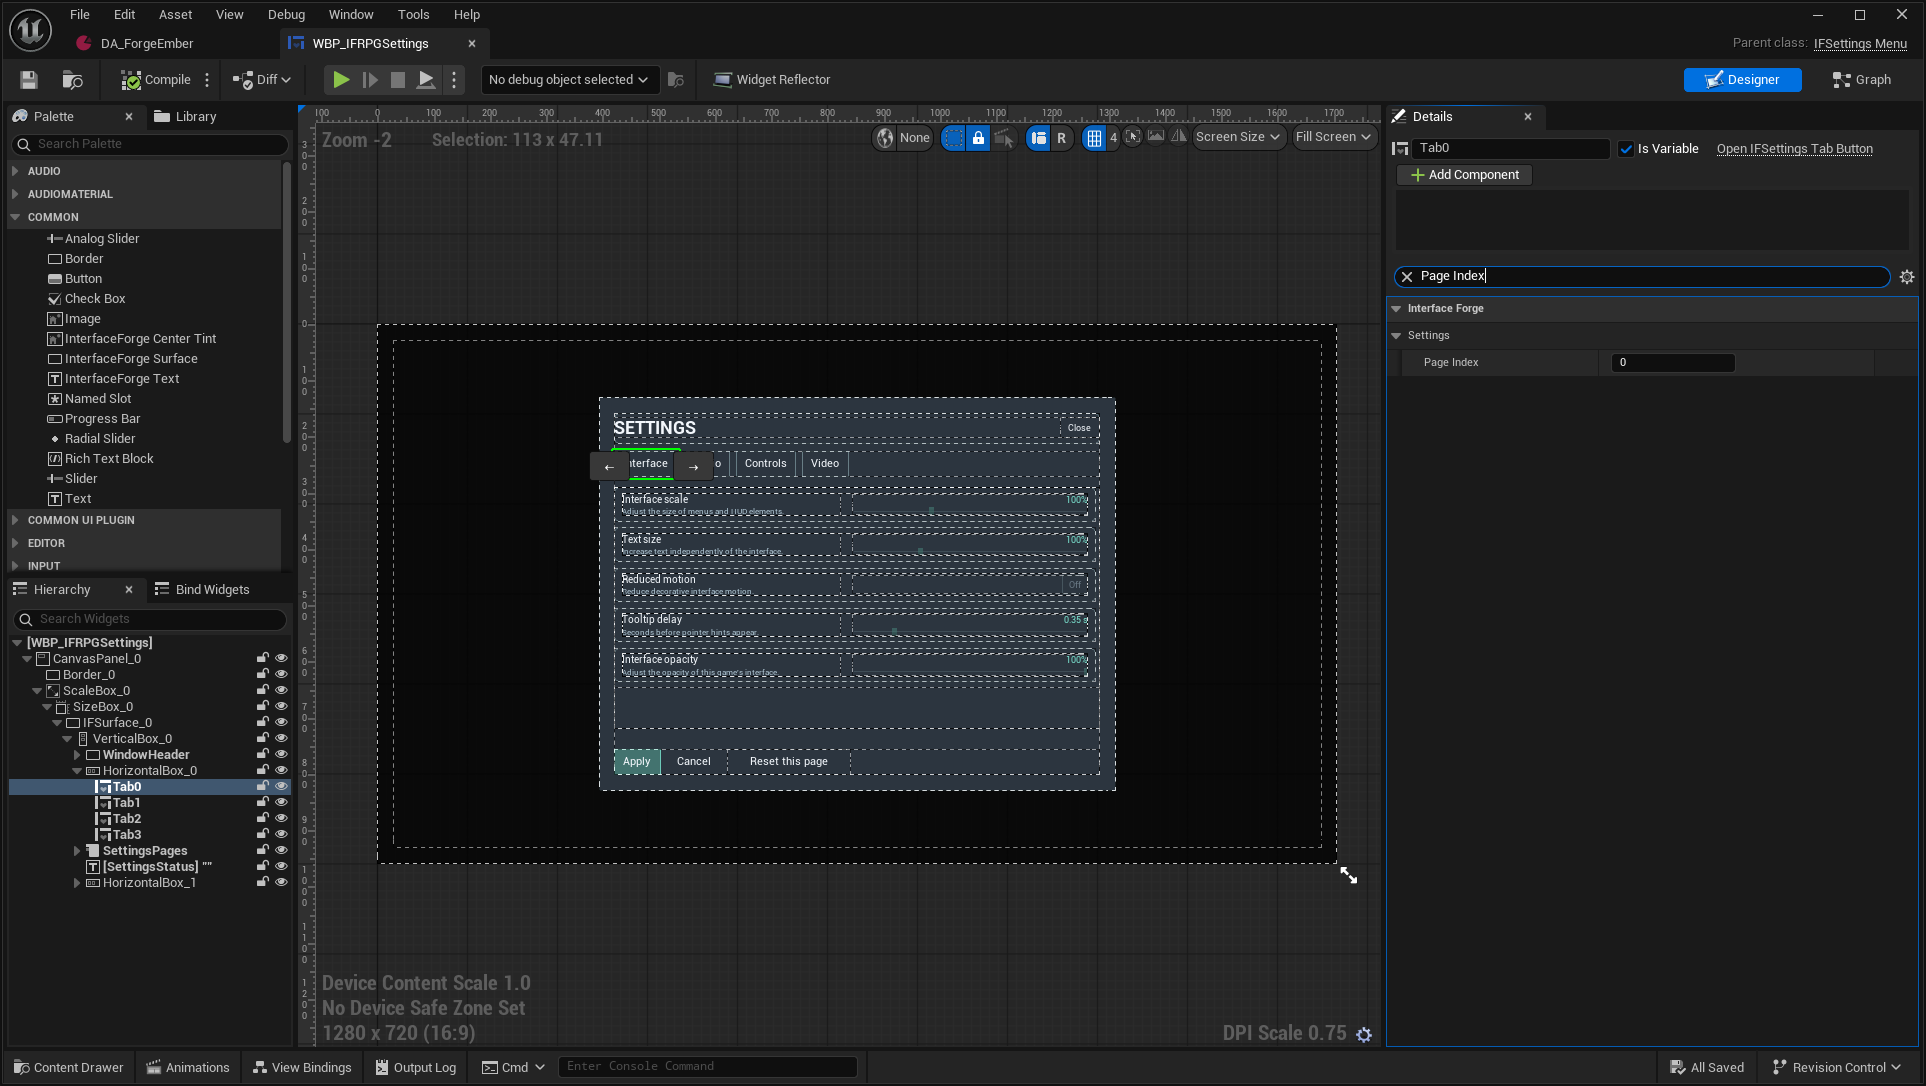
The menu connects these buttons automatically. For a custom tab design, call Select Settings Page and use On Settings Page Changed for presentation/focus or a UMG animation.
Expected: changing tabs retains every draft value. It does not Apply or Cancel the session.
3. Define a real value
Create a Data Asset of class IFSettingDefinition. Open /Game/ForgeExamples/UI/Settings/DA_Setting_UIScale to compare fields.
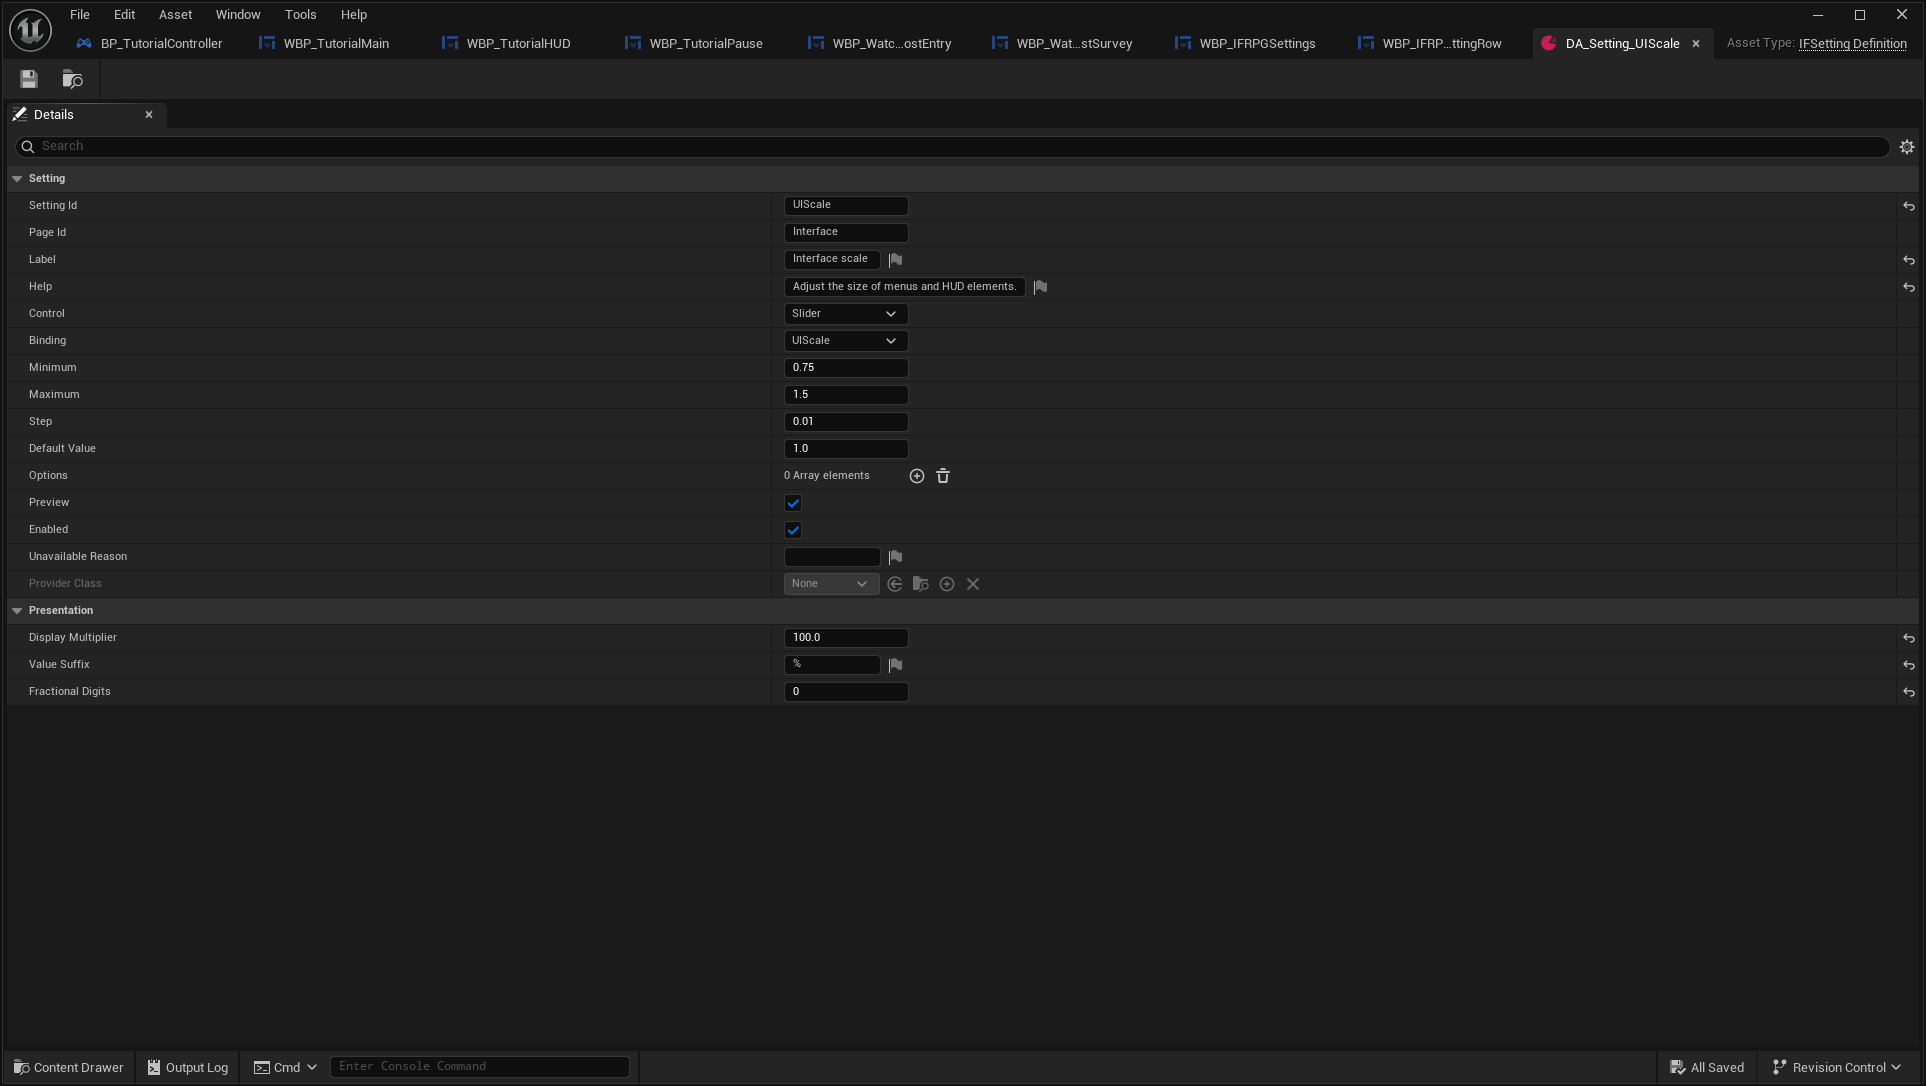
Set Setting Id, Page Id, localized Label/Help, Binding, Control, Minimum/Maximum, Step and Default Value. UI scale uses its builtin binding. A slider's bounds must stay within that binding's supported range. Display Multiplier, Value Suffix and Fractional Digits control display formatting: a stored 1 can display as 100%.
Toggle values are 0/1. Choice definitions supply localized options with stable numeric values. Do not use translated display labels as persistence keys.
Expected: one definition describes the value independently of its widget layout. Builtin UI/audio preferences use UIForge's settings service; supported video options use Unreal GameUserSettings.
4. Create your own row in Blueprint
Create a Widget Blueprint with parent IFSettingRow, or inspect /Game/ForgeExamples/UI/RPG/WBP_IFRPGSettingRow. Build the layout you want. Name only the controls it uses:
| Designer name | Widget | Meaning |
|---|---|---|
| LabelText / HelpText | Text Block or IFText | Definition text |
| ValueText | Text Block or IFText | Formatted numeric value |
| ValueSlider | Slider | Slider value/range/step |
| ValueToggleButton | IFButton | Themed On/Off control |
| ValueToggle | Check Box | Alternative boolean control |
| ValueChoice | Combo Box String | Choice options |
| StatusText | Text Block or IFText | Validation/unavailable reason |
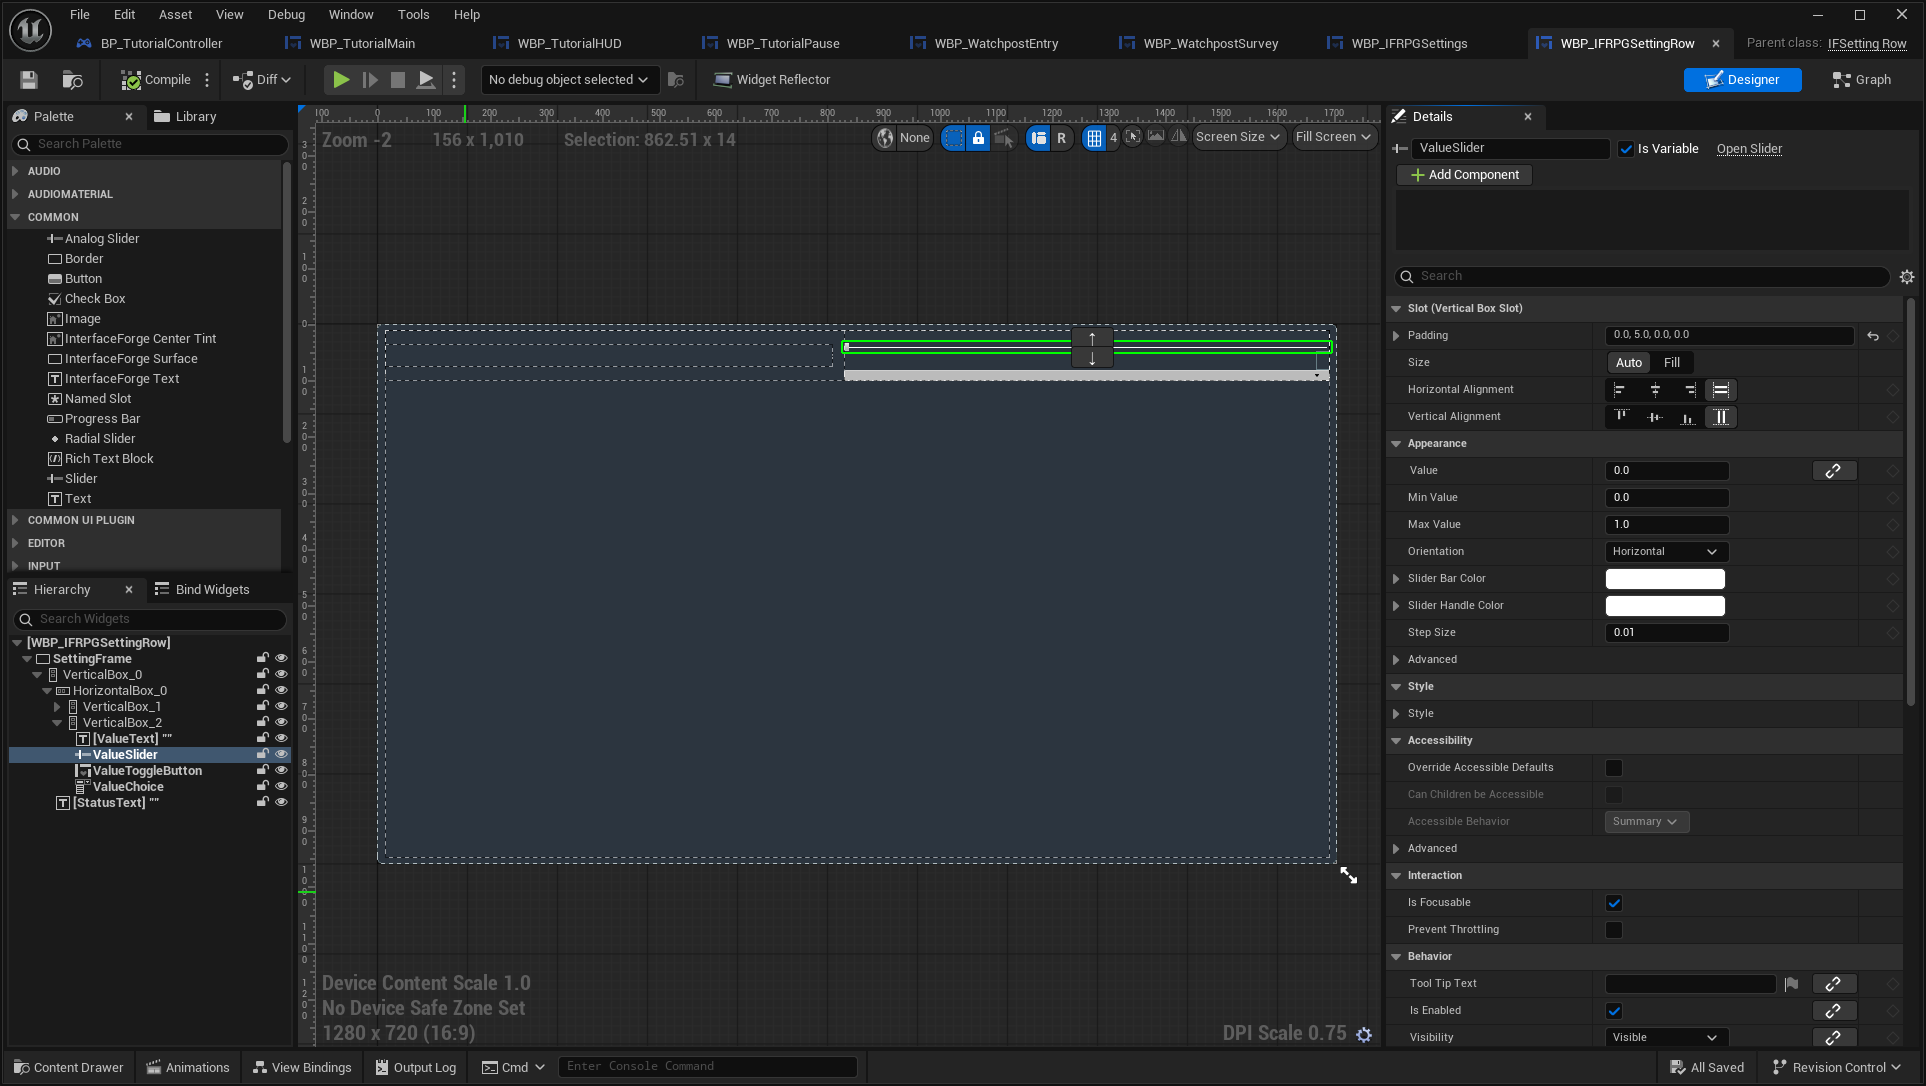
The parent initializes the useful controls and collapses those not selected by the definition. In Designer, a row with a definition can preview its label/default without opening a settings transaction. A bare row layout without a definition is a template.
For a custom control, implement On Setting Refreshed to present the value and call Submit Setting Value when the player edits it. Use On Setting Submitted for success/failure feedback. Keep engine setters out of each individual row.
5. Place the row and assign its definition
Place your row on its page and set Definition. In the saved settings screen, select Setting_UIScale and choose DA_Setting_UIScale.
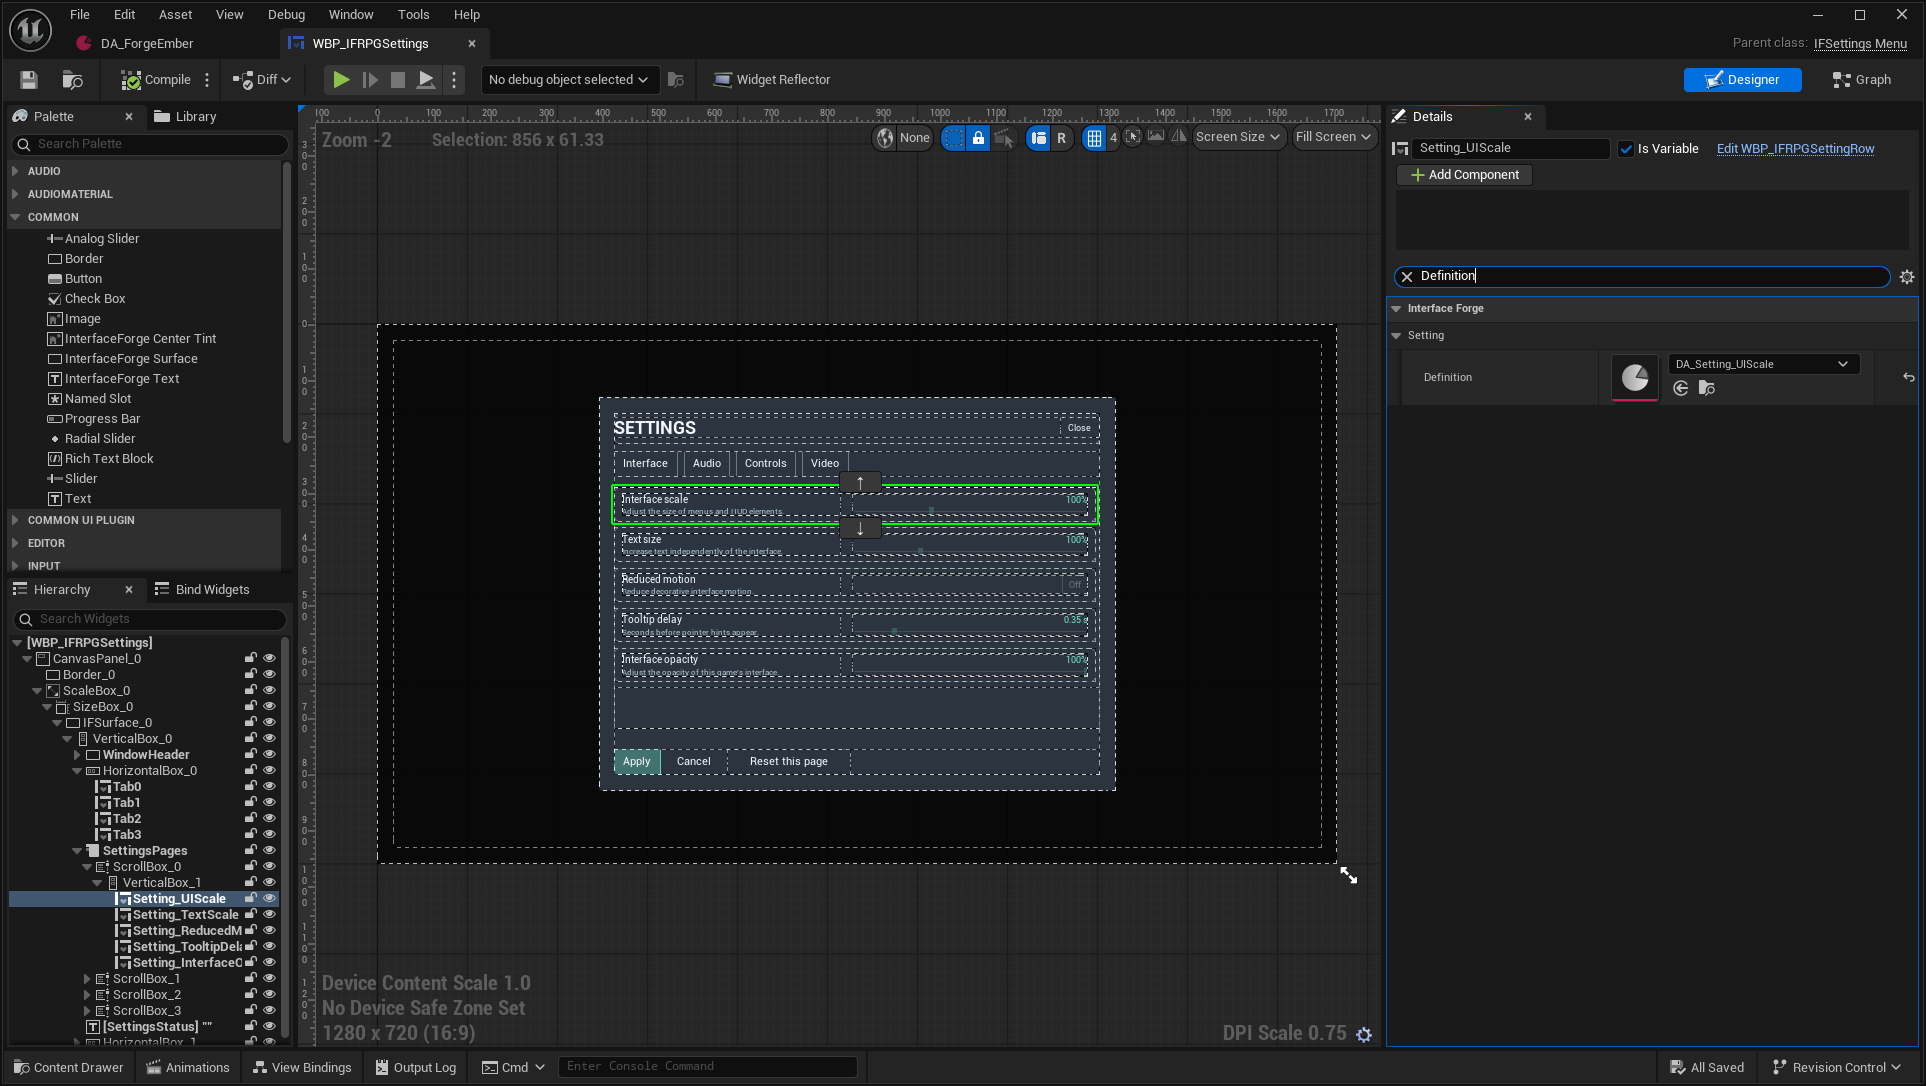
The menu discovers Designer rows across its pages and initializes their sessions. For rows created at runtime, register definitions in Additional Definitions before opening, then Create Widget → Set Definition → Add Child → Initialize Setting, using the menu's Editing Session.
Expected: you can replace the row class, help layout, colors or control art while retaining the setting's rules and persistence contract.
6. Add input rebinding
Enable Include Input Bindings on the menu. Place Blueprint children of IFBindingEntry on Controls. /Game/ForgeExamples/UI/WBP_IFBindingEntry shows the editable key selector and optional glyph/text overlay.
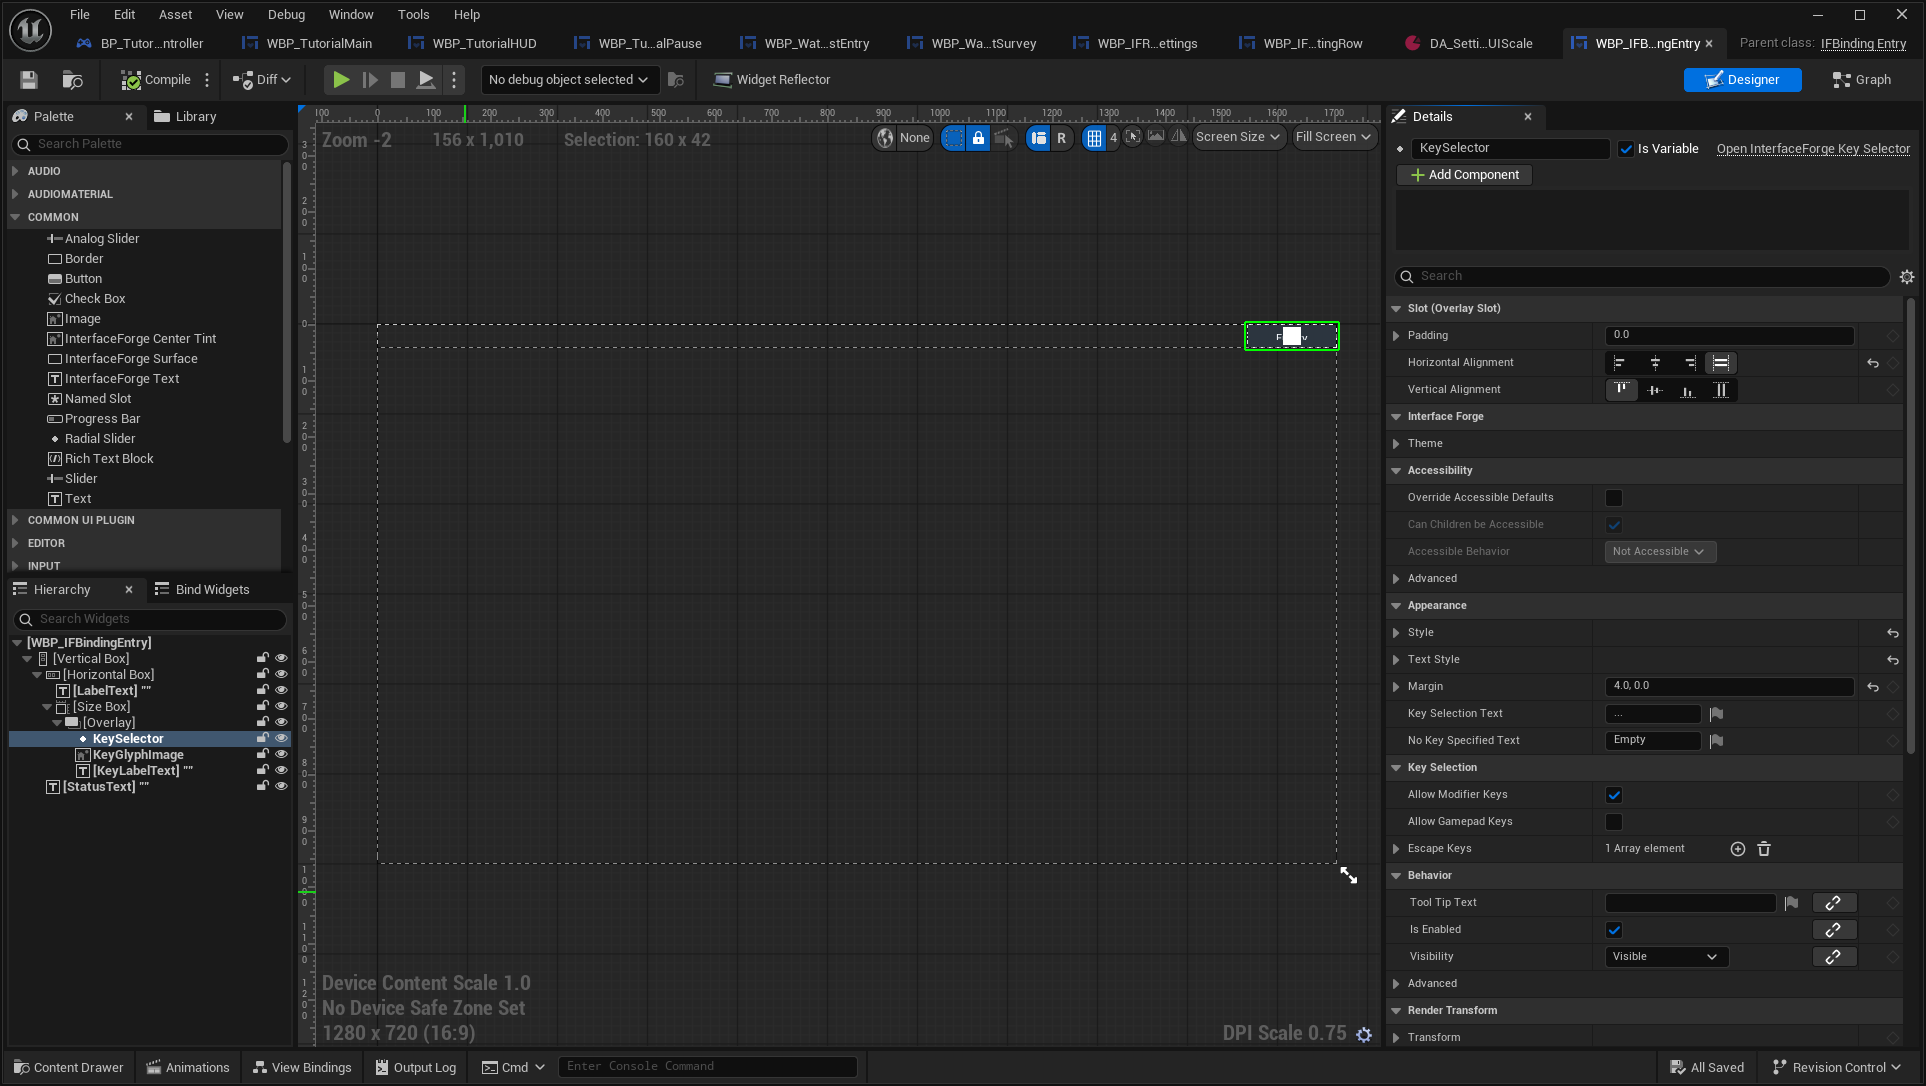
On each row instance, set Mapping Name, Family and Label. The mapping must already be registered through Enhanced Input User Settings and exist in a player-mappable context.
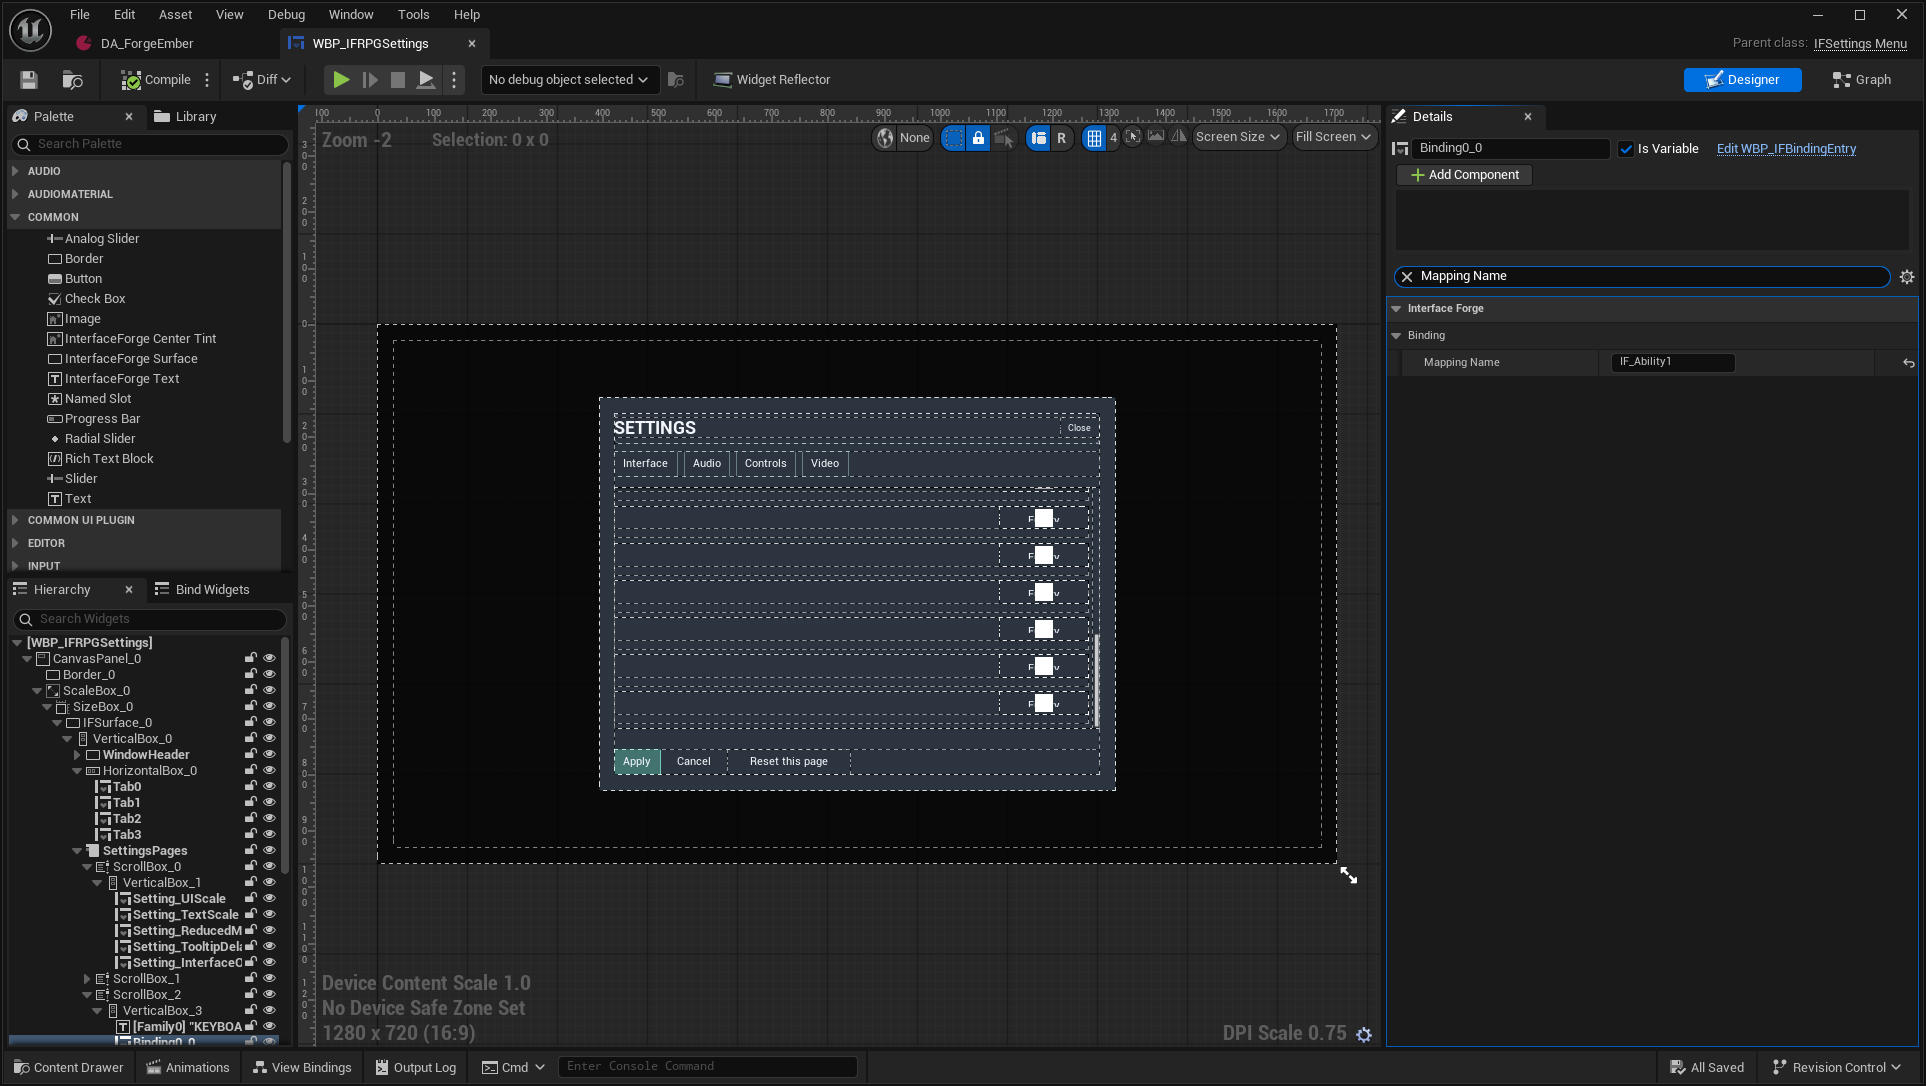
Do not add a second IFRemappingScreen inside this menu: that would introduce another transaction owner and Apply button. Bind IFActionPrompt → Mapping Name to the same registered name so prompts follow applied keys.
Expected: selecting a key starts capture; a valid change stays staged until Apply. Cancel discards it. Software controller fixtures do not certify physical devices; controller/touch hardware checks remain deferred.
7. Wire one footer and focus contract
Use IFButton controls named ApplyChoice, CancelChoice, DefaultsChoice and a Text Block named SettingsStatus. The menu supplies behavior. Label DefaultsChoice Reset this page: it resets the current page, not every category. Use an explicit separate control calling Restore All Defaults for a global reset.
Set Initial Focus Name = Tab0, Fallback Focus Name = CancelChoice. Open the screen through the root's Push Screen, on Menu, from either main or pause. Back cancels the session; an open dropdown receives dismissal first.
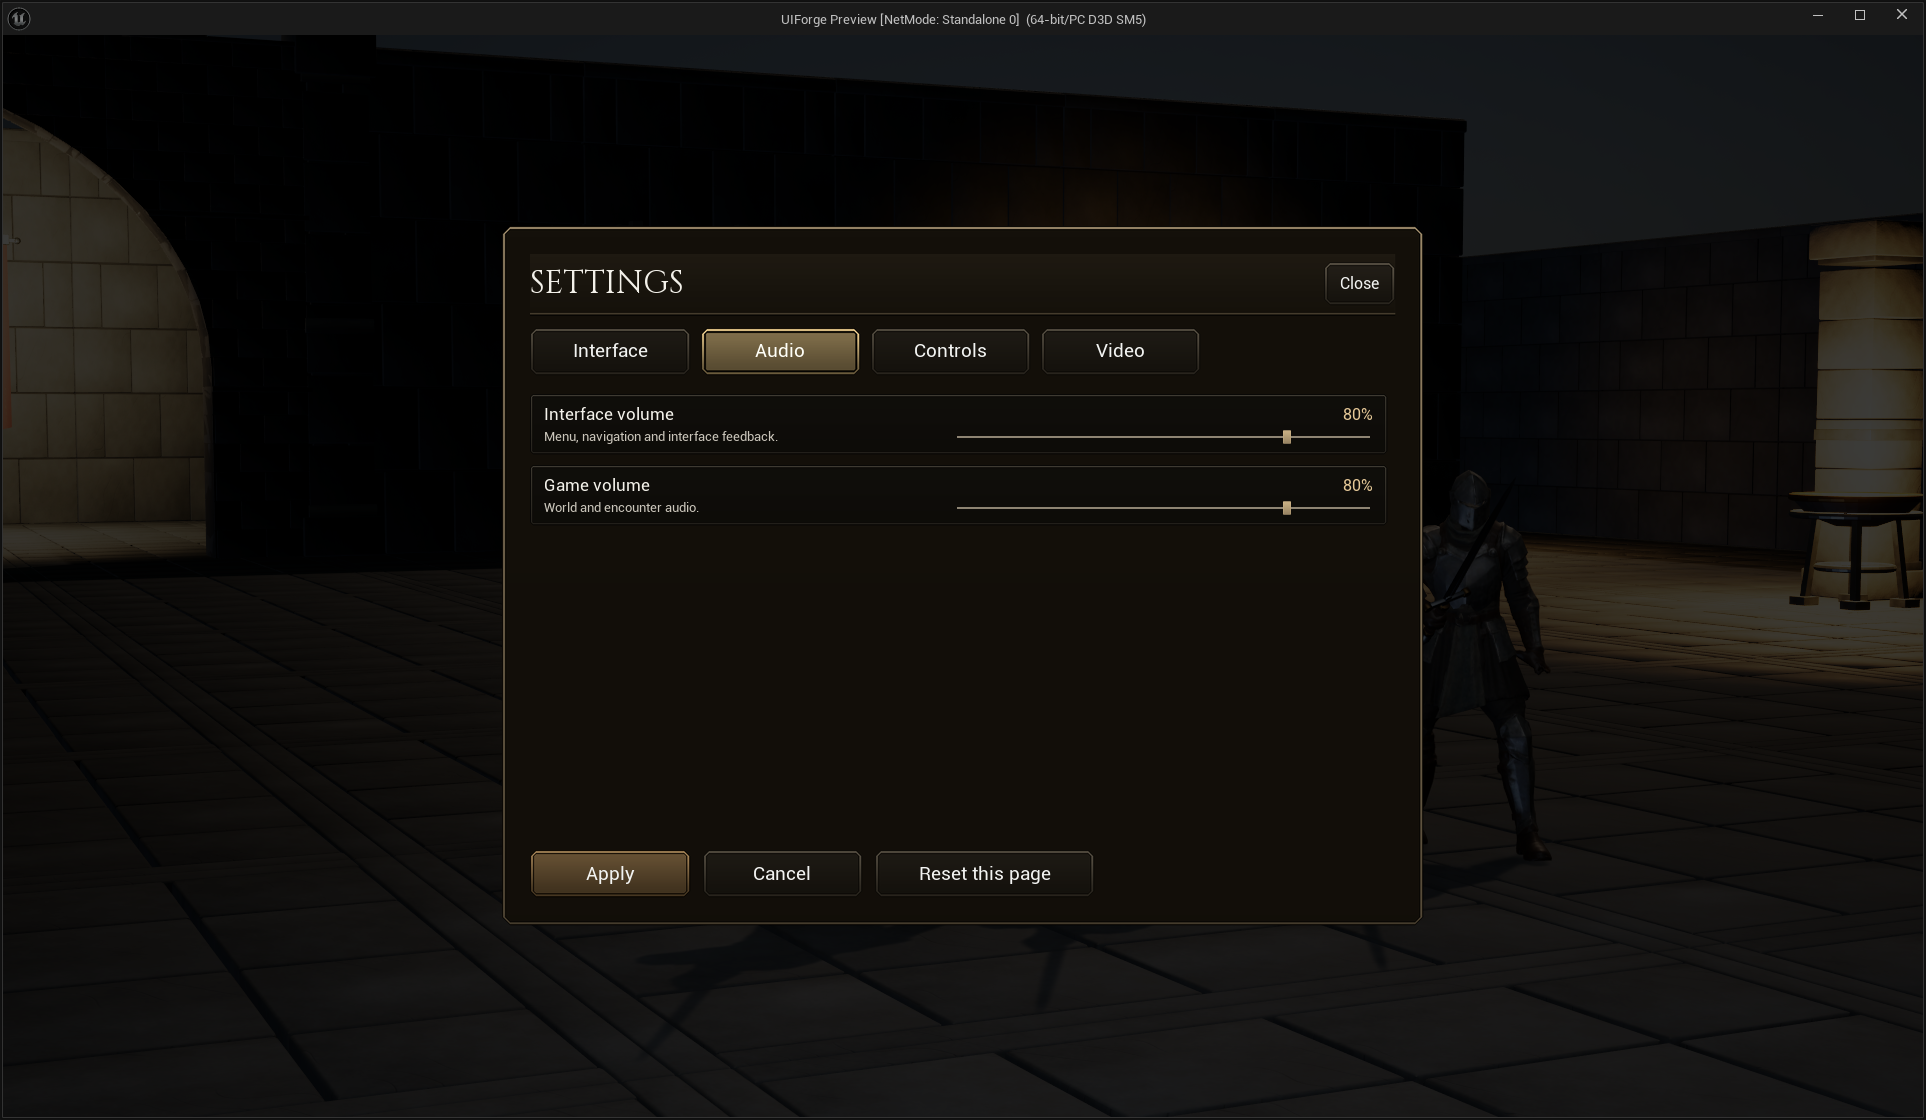
Expected: an audio or scale preview changes the example immediately; Cancel restores the prior presentation. Apply commits supported values. The detailed settings contract explains rollback limits: SaveGame, Enhanced Input and GameUserSettings are not a single atomic disk transaction.
8. Extend with a Blueprint provider
For a game-owned setting, create a Blueprint child of IFSettingProvider. Implement Read Value, Validate Value, Preview Value, Commit Value, Restore Value. Assign the provider class on a Custom setting definition.
The included /Game/ForgeExamples/UI/Settings/BP_IFOpacityProvider is a complete example. Read loads the game's own preference; Preview updates the local root; Commit persists; Restore undoes preview or a partial commit.
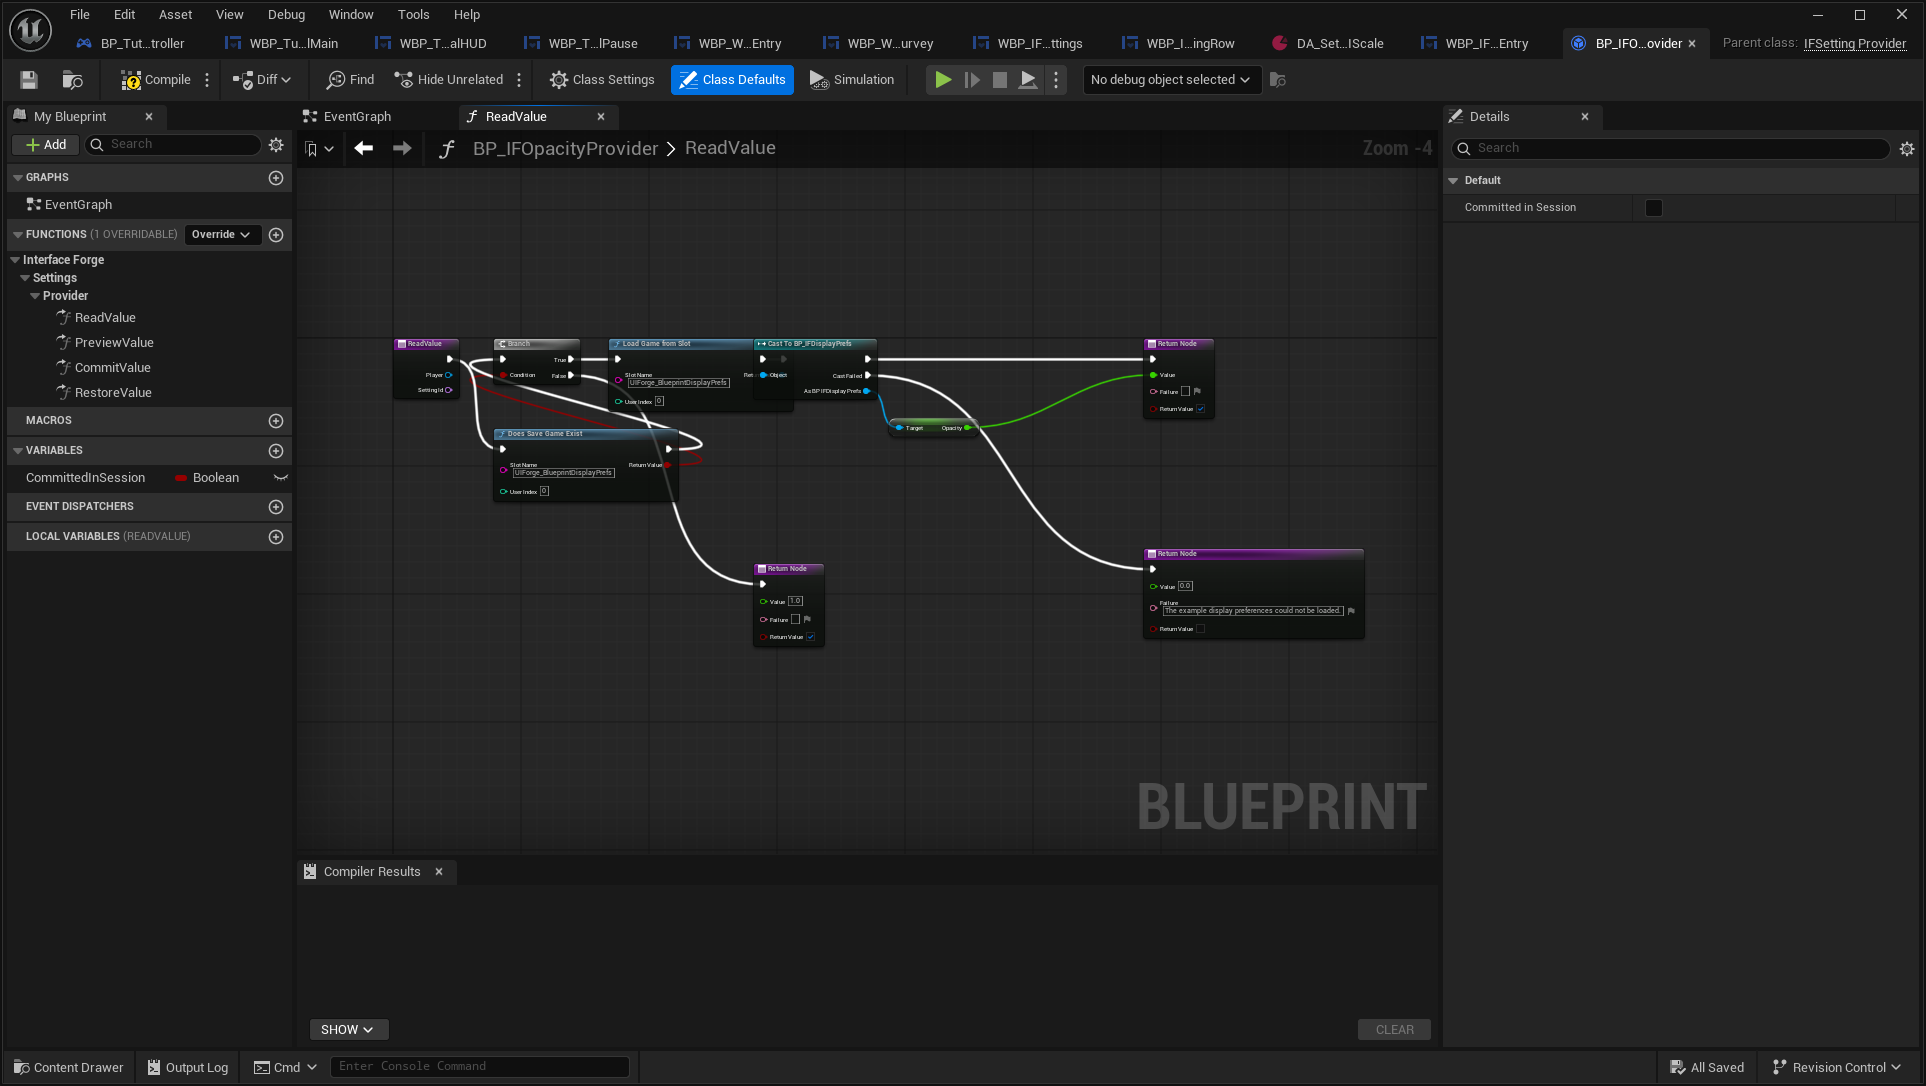
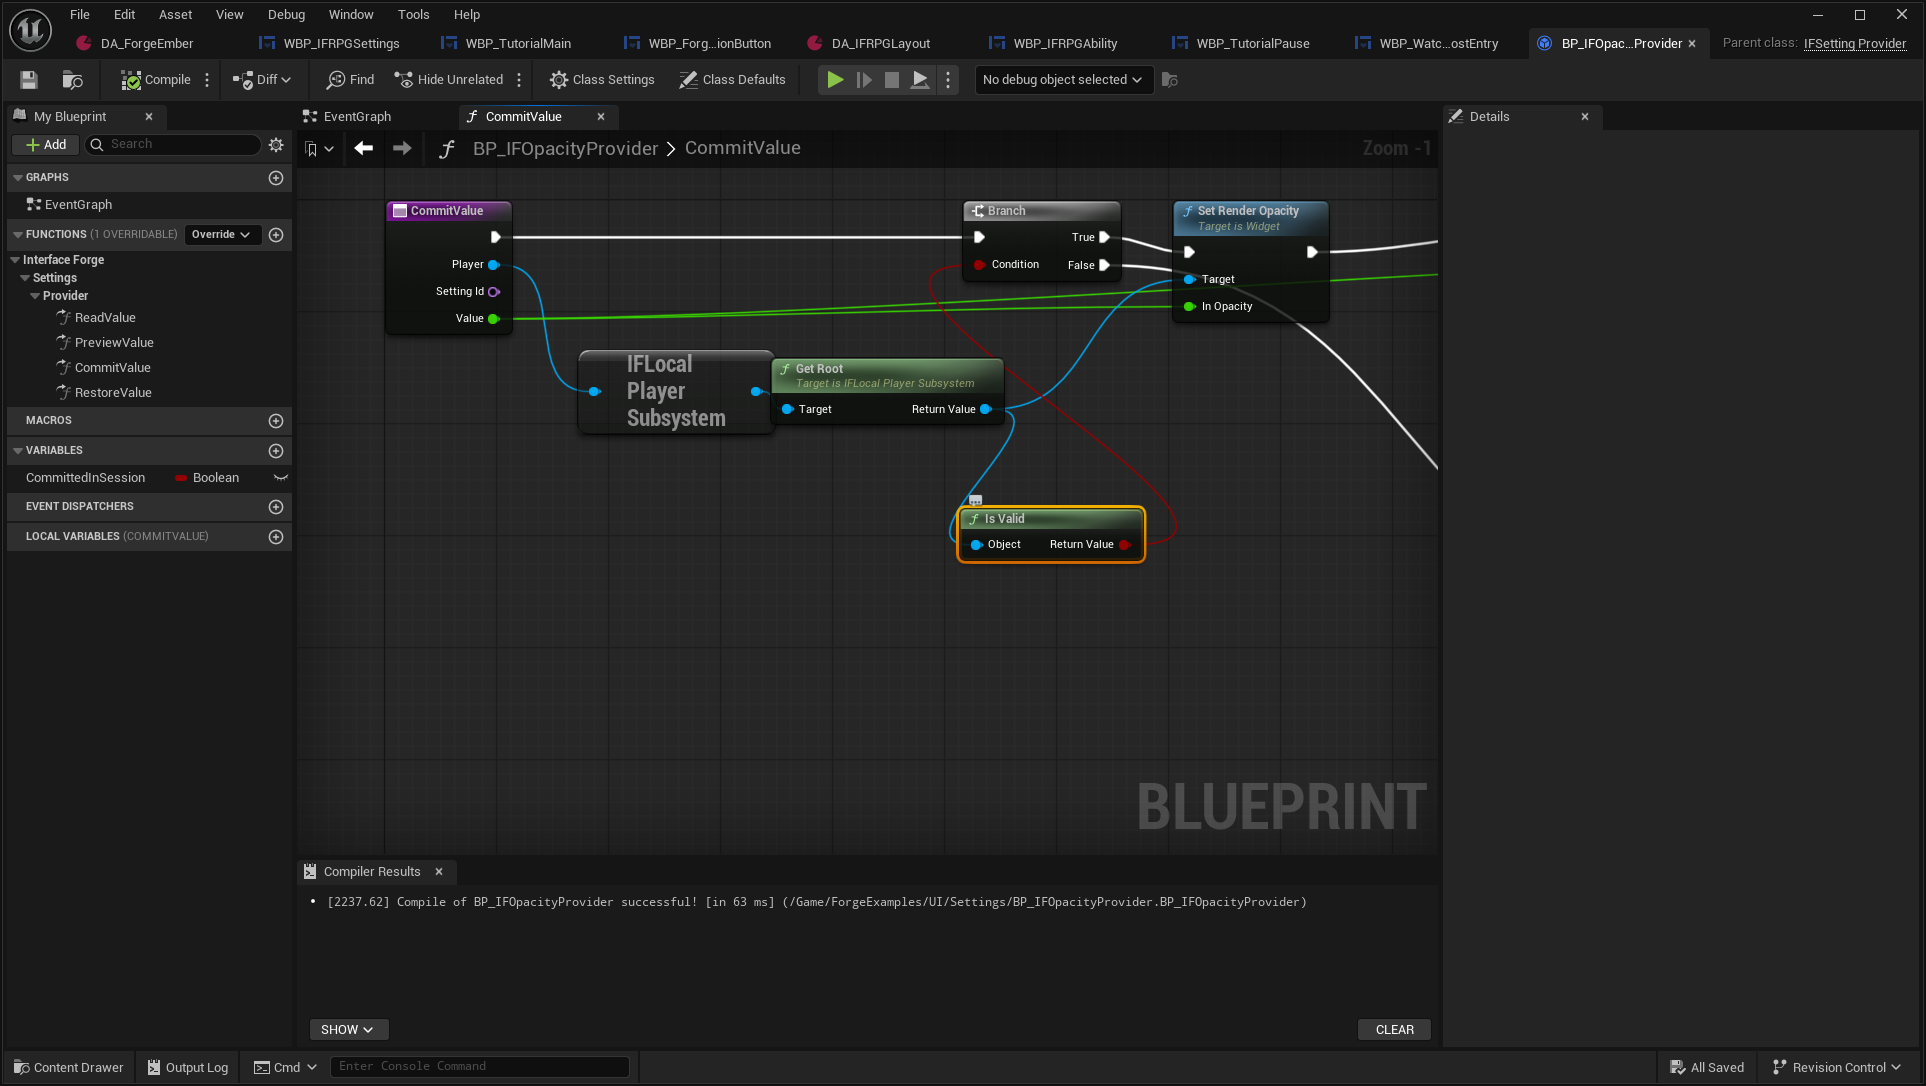
Use the supplied Player to get IFLocal Player Subsystem → Get Root. Branch on Is Valid before Set Render Opacity; return a failure when the root is unavailable.
After the preview succeeds, the example uses Create Save Game Object (BP_IFDisplayPrefs), sets Opacity, then calls Save Game to Slot. Its return value must drive a success/failure Branch.
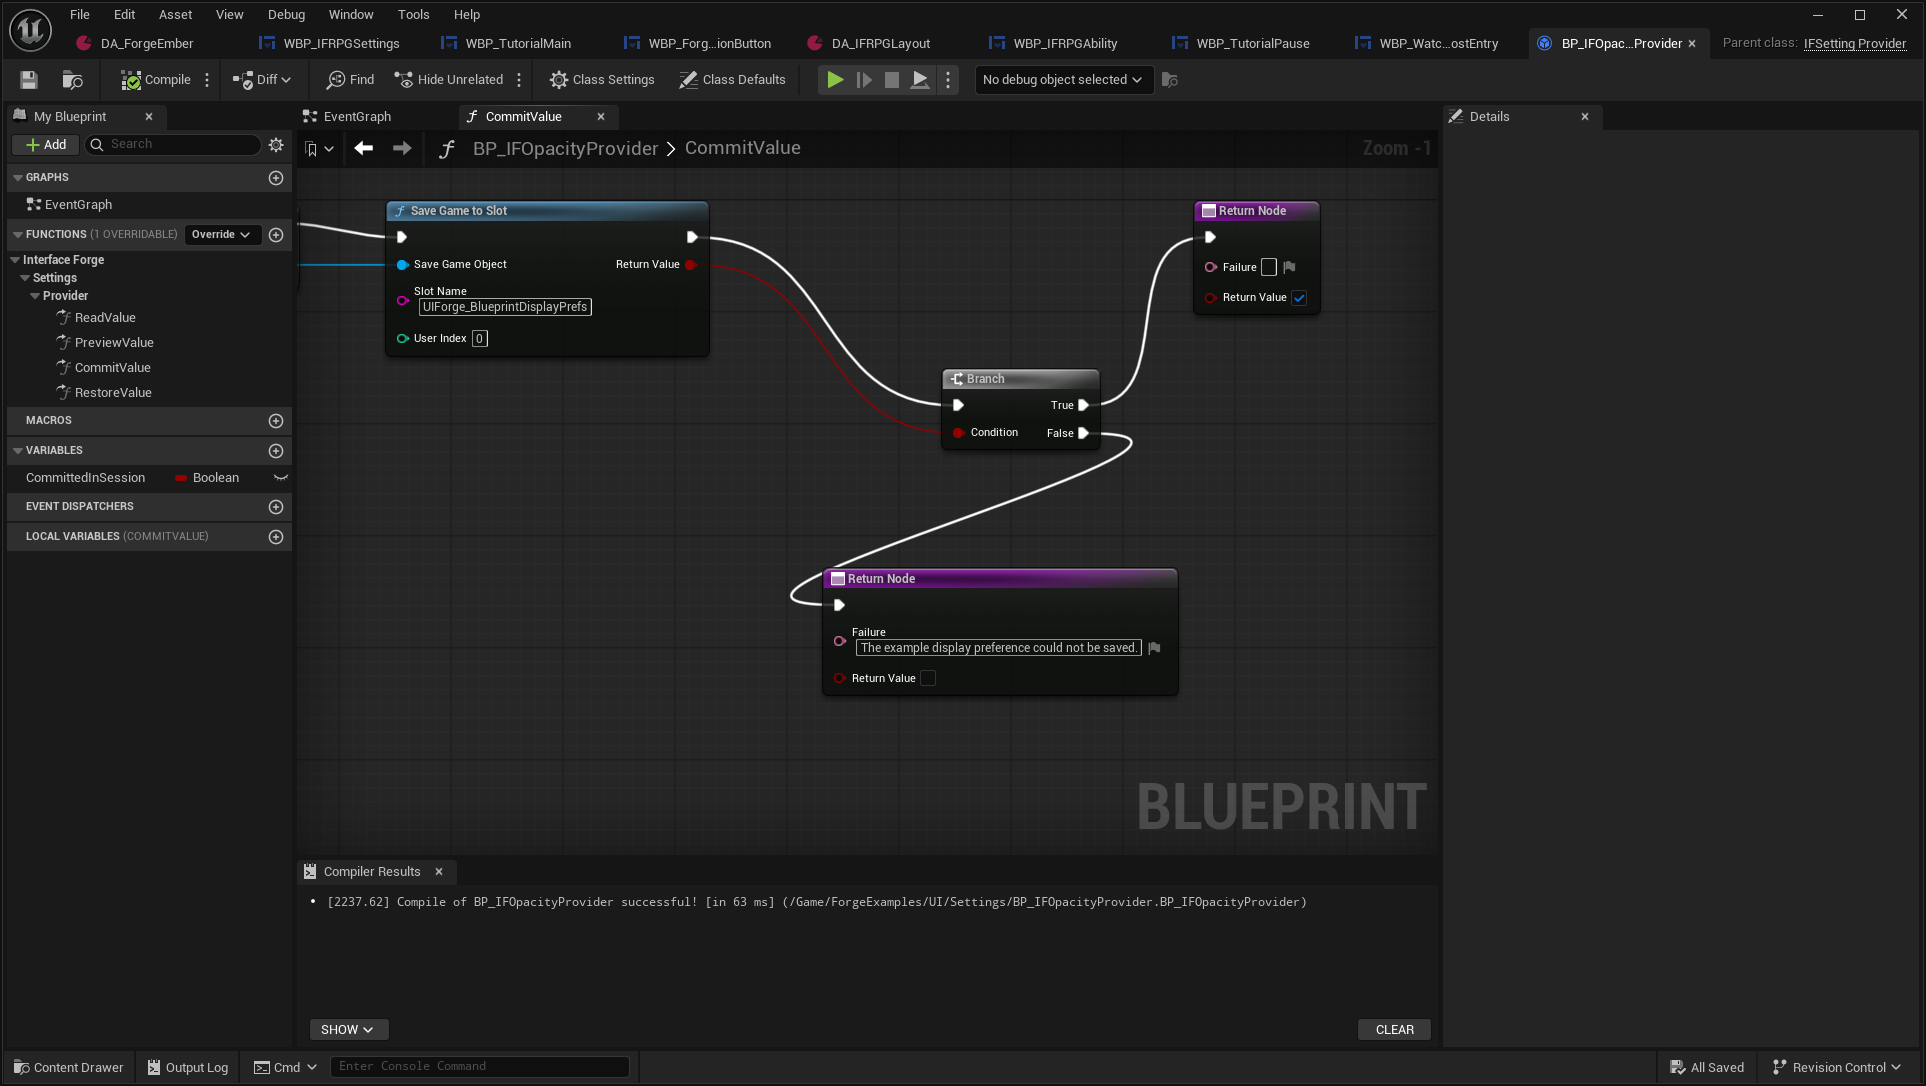
The slot is this example's own display preference, not UIForge's builtin preference slot. Return false and a useful Failure text when saving fails. Preview alone must never be reported as a successful persistent commit.
Keep the owning controller and stable Setting Id supplied by the session. At game startup, apply your saved custom setting after creating the root through your provider's public contract. Builtin UI/audio/video bindings already have their own engine-backed paths; don't duplicate them in a custom provider.
9. Check the complete flow
Preview a scale/audio change, change tabs, stage a key, Cancel, reopen and confirm the old values. Repeat with Apply, restart the game process and verify persistence and remapping-aware prompts. Test Reset this page separately from Restore All Defaults. Check validation, long labels, keyboard focus and dropdown Back behavior.
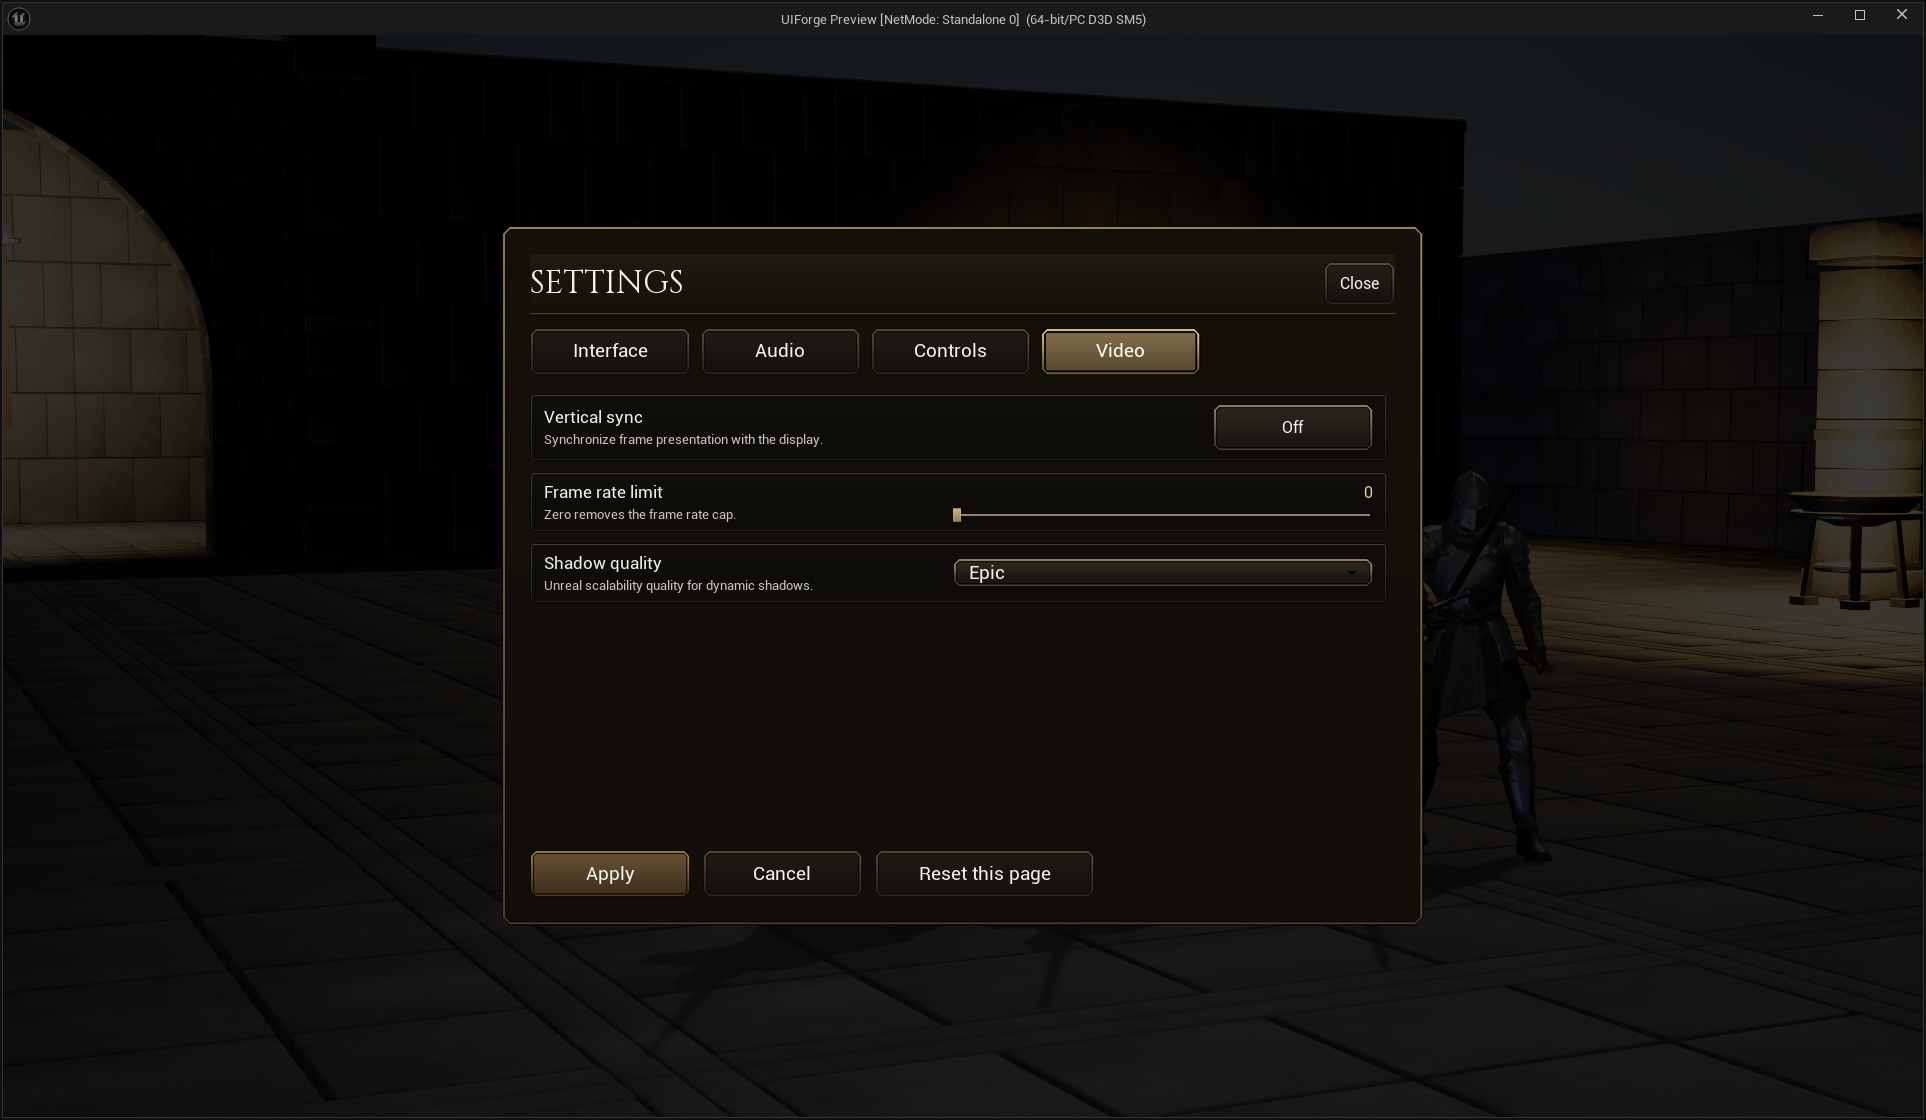
These builtin video rows cover the supported quality/VSync/frame-limit bindings. They are not a display-resolution confirm/revert implementation. Add that workflow using Unreal's existing GameUserSettings confirmation APIs if your project needs it. See settings and audio, localization and full game integration for the surrounding setup.